Using a Facebook Lead Form can be a great, cost-effective way to generate leads for your business. However, generating leads on Facebook successfully requires a thoughtfully-created form that not only targets the right audience but also encourages them to complete the form and share their contact details with you.
In this article, we’ll provide a comprehensive tutorial on creating effective Lead Forms for Facebook. We’ll also explore the key components essential for designing and launching successful forms that engage and convert.

First, here’s what you need in place to create a Lead Form
Facebook’s Lead Forms is a feature of Facebook Ads that is tied to Facebook Business Pages and the Ads Manager platform. You can only create and publish a Lead Form on Facebook by running a Lead Ad on the platform. Here’s what you need to create a Lead Form on facebook:
- Business Page: Your Business Page serves as an important online presence for your business. Apart from sharing company updates and reaching potential customers organically, you need it to run promotional activities on Facebook. It’s pretty easy to create a Business Page on Facebook in case you don’t already have one. Here’s the process:
- Login to your profile and go to the Pages section.
- Click on “Create Page“ and provide information about your business.
- Fill out all the fields with the relevant information and images.
- Click on the Create Page button and your Facebook Business Page is ready.
- A privacy policy URL: A privacy policy is a legal document that explains how you collect and use the personal data of your leads. You’re legally required to provide a privacy policy if you’re collecting personal information online through any means (which includes Facebook forms). You can easily create and host your own customised privacy policy within seconds. The easiest way to create a privacy policy is by using a free privacy policy generator tool. You just need to visit the tool and enter some basic details about your business. Your privacy policy will be ready with a fully hosted URL within seconds. Here’s a guide for you if you want to know more about privacy policies and how to create one.
- Visual elements for your ad: Visual elements play a crucial role in attracting and engaging your target audience. This part may consist of an image or a creative asset along with a message, and a call to action (CTA) button. Creative assets show up in the feed of your target audience. Getting it right attracts potential customers to fill out your form. It’s best if you work on your ad’s visual elements before putting together your campaign.
How to create a Lead Ad Campaign on Facebook
Lead Forms on Facebook is a part of Lead Ad Campaign. Here’s a brief, step-by-step overview of the process of creating a Lead Ad Campaign on Facebook:
Step 1: Access the Ads Manager
- Log in to Facebook Business and access the Ads Manager.
- Click the + Create button to start a new ad, and choose ‘Lead’ as your objective.
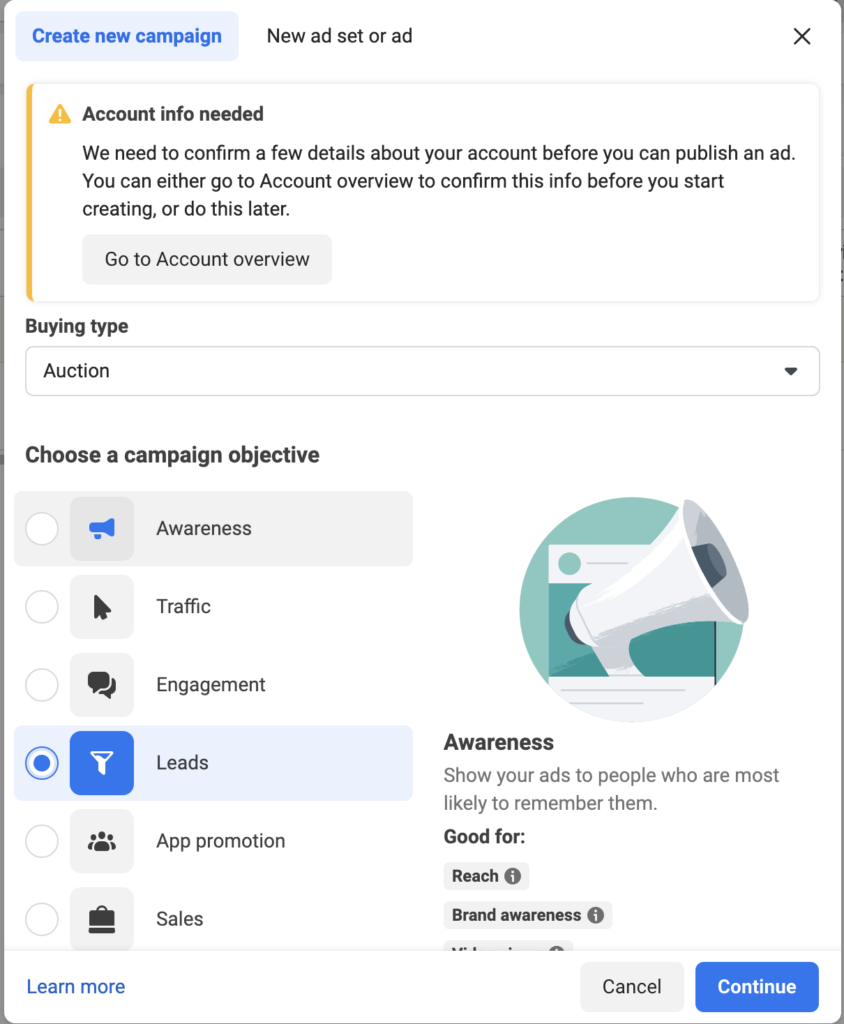
Step 2: Create your campaign
- Choose ‘Leads‘ as the campaign objective.
- Name your campaign and set details.
- Select your Business Page and accept Facebook’s Lead Ads Terms and Conditions.
Step 3: Set targets
- Set your target audience based on factors like location, age, language, and interests.
Step 4: Upload the ad creative
- Upload relevant and visually appealing creative assets.
Step 5: Create the Lead Form
- In the ad setup, select ‘Create form’.
- Create the headline, text, and CTA for your ad.
- Decide on the information to collect from leads. Tip: Facebook allows you to use prefilled or custom questions.
Step 6: Set up privacy policy
- Add a link to your privacy policy. If you already don’t have one in place, generate your privacy policy with this privacy policy generator tool in seconds.
Step 8: Review and publish your Ad
- Double-check all components for accuracy.
- Publish your ad.
- Your ad will be published once the review is complete.
If you’re looking for a more comprehensive guide to running Lead Ads on Facebook, check out our post on how to create Lead Ads on Facebook.
How to create a Lead Form on Facebook
The Lead Form part comes after you’ve completed the process of adding creatives for your ad. A Lead Form is an important part of your Facebook Lead Ads. Here’s a comprehensive, step-by-step guide to creating a lead form:
Step 1: Initiate form creation
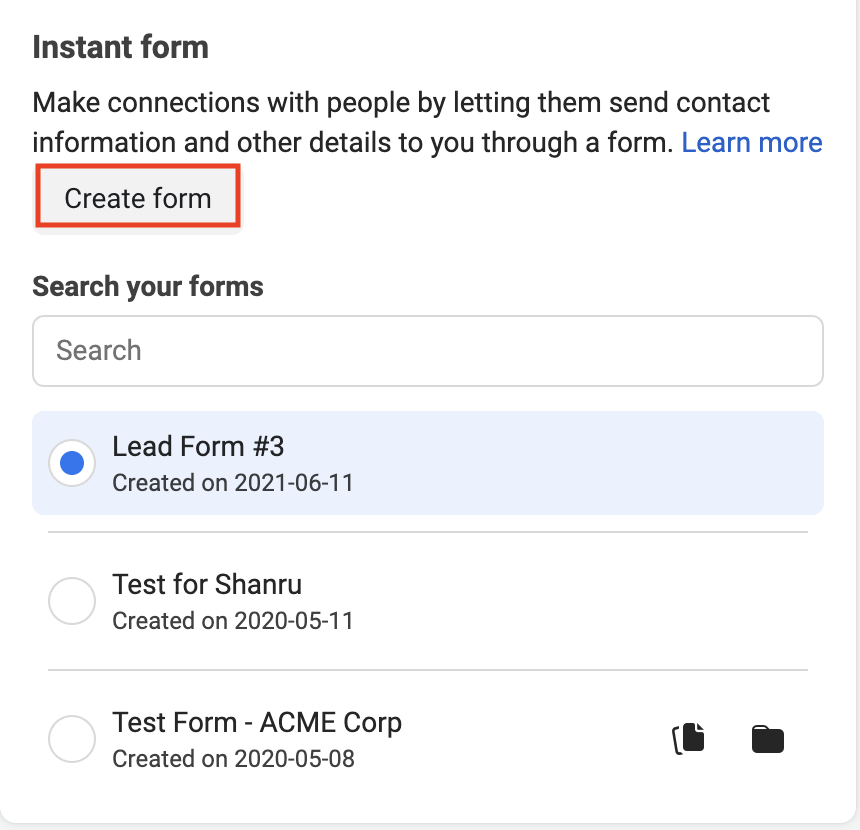
- Once you’re done with adding your creatives, scroll down and look for the “Instant Form” option.
- Click on “Create Form” or select an existing form if you want to use a previous form.
Step 2: Name your form
- Name your form in the Form Name field.
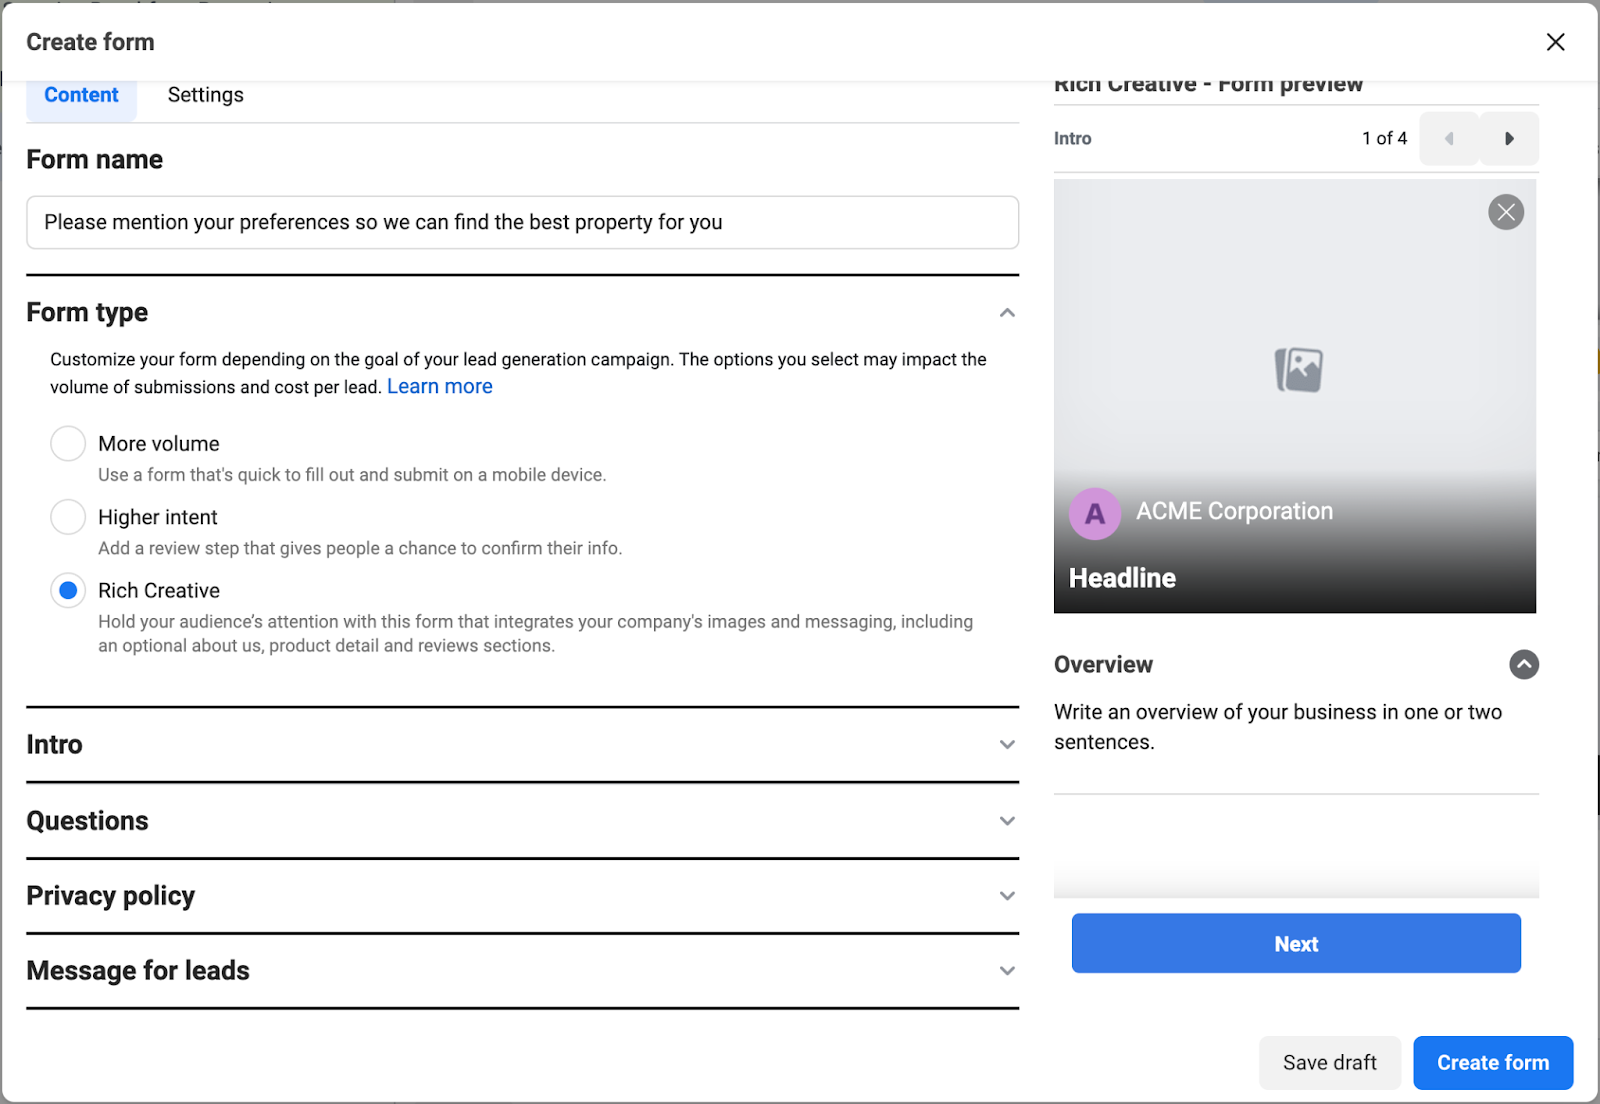
Step 3: Choose the form type
- Facebook now offers three types of forms: 1) More Volume, 2) Higher Intent, and 3) Rich Creative.
- Choose the More Volume option to create simple forms that users can easily fill out and submit. The Higher Intent option allows you to add an additional review step, allowing users to ensure they have filled out the form accurately. Select this option to receive more qualified leads. And lastly, the Rich Creative option allows you to provide detailed information about your product and services, including images, product details, reviews, and much more. This can be a great choice if you’re looking for highly targeted quality leads.
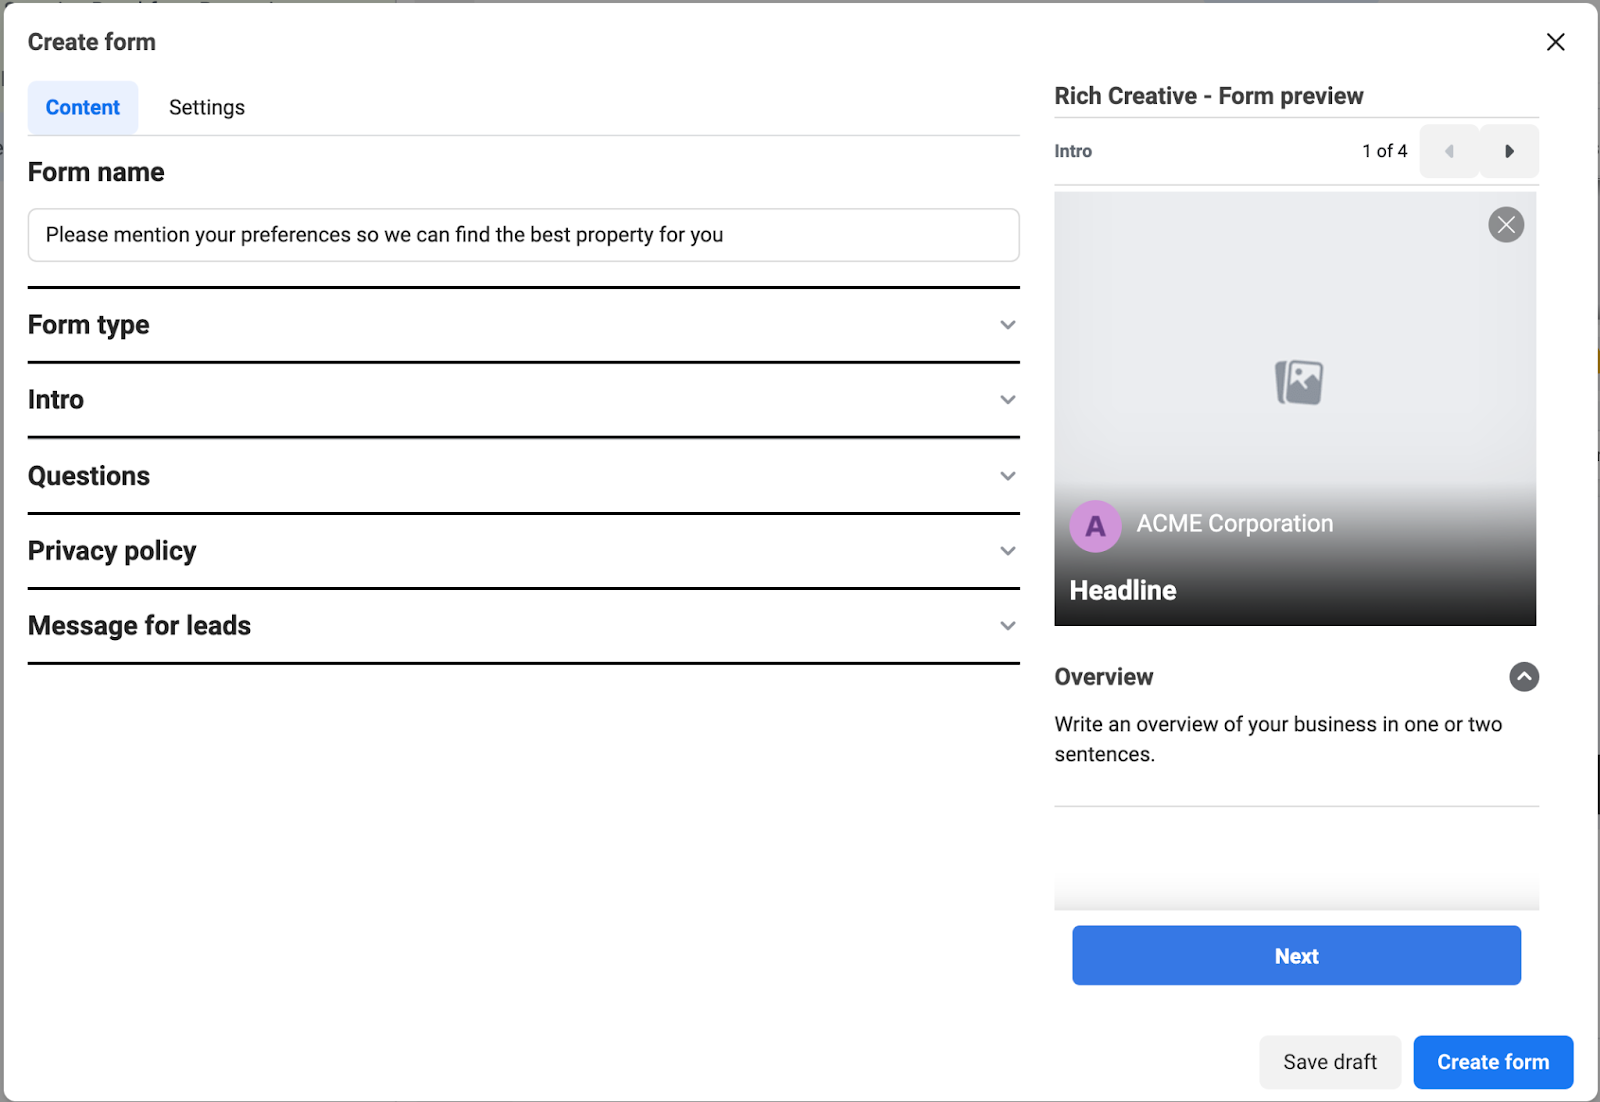
Step 4: Customise the form
- Give your form a descriptive name and add a brief introduction to your form. This could include details about what users are signing up for. You can include an image and a headline here.
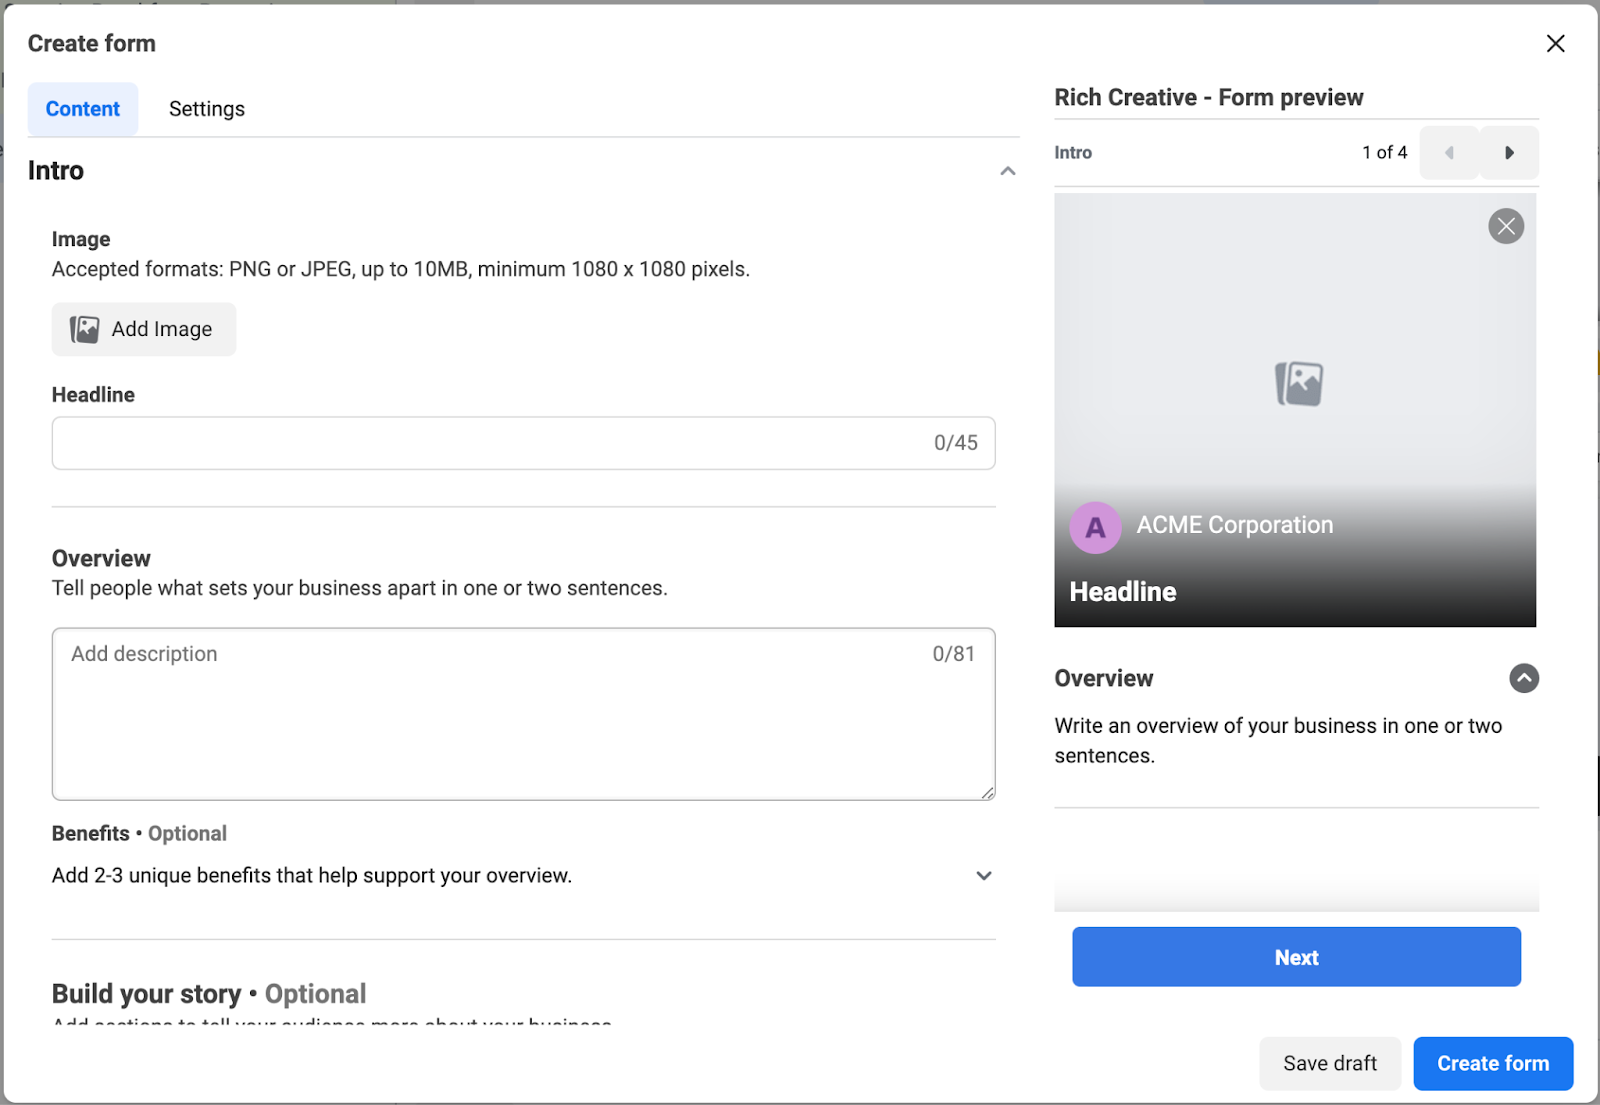
Step 5: Set up your questionnaire
- Select the fields you want to include in your form, such as name, email, phone number, etc. Facebook offers a range of standard fields, and you also have the option to create custom questions. Remember, the fewer fields you have, the easier it is for users to complete the form.
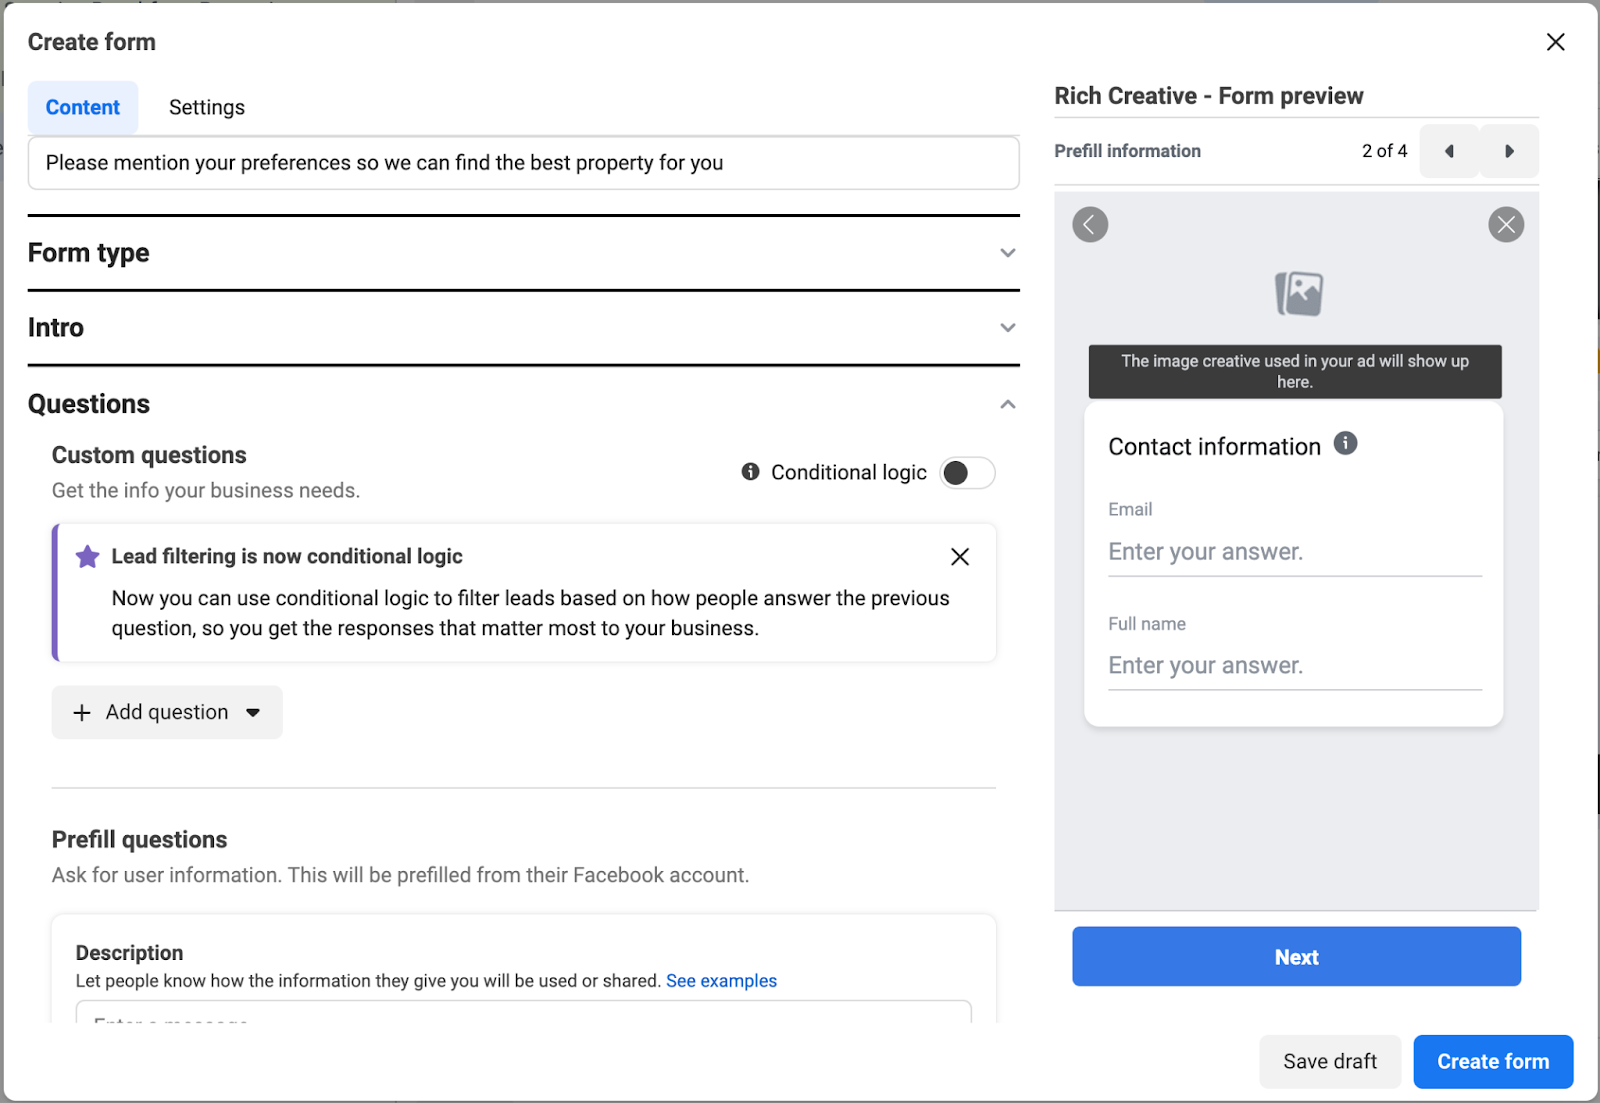
Check out this article for Inspiring Facebook Lead Ad Examples and Questions across 10 Industries.
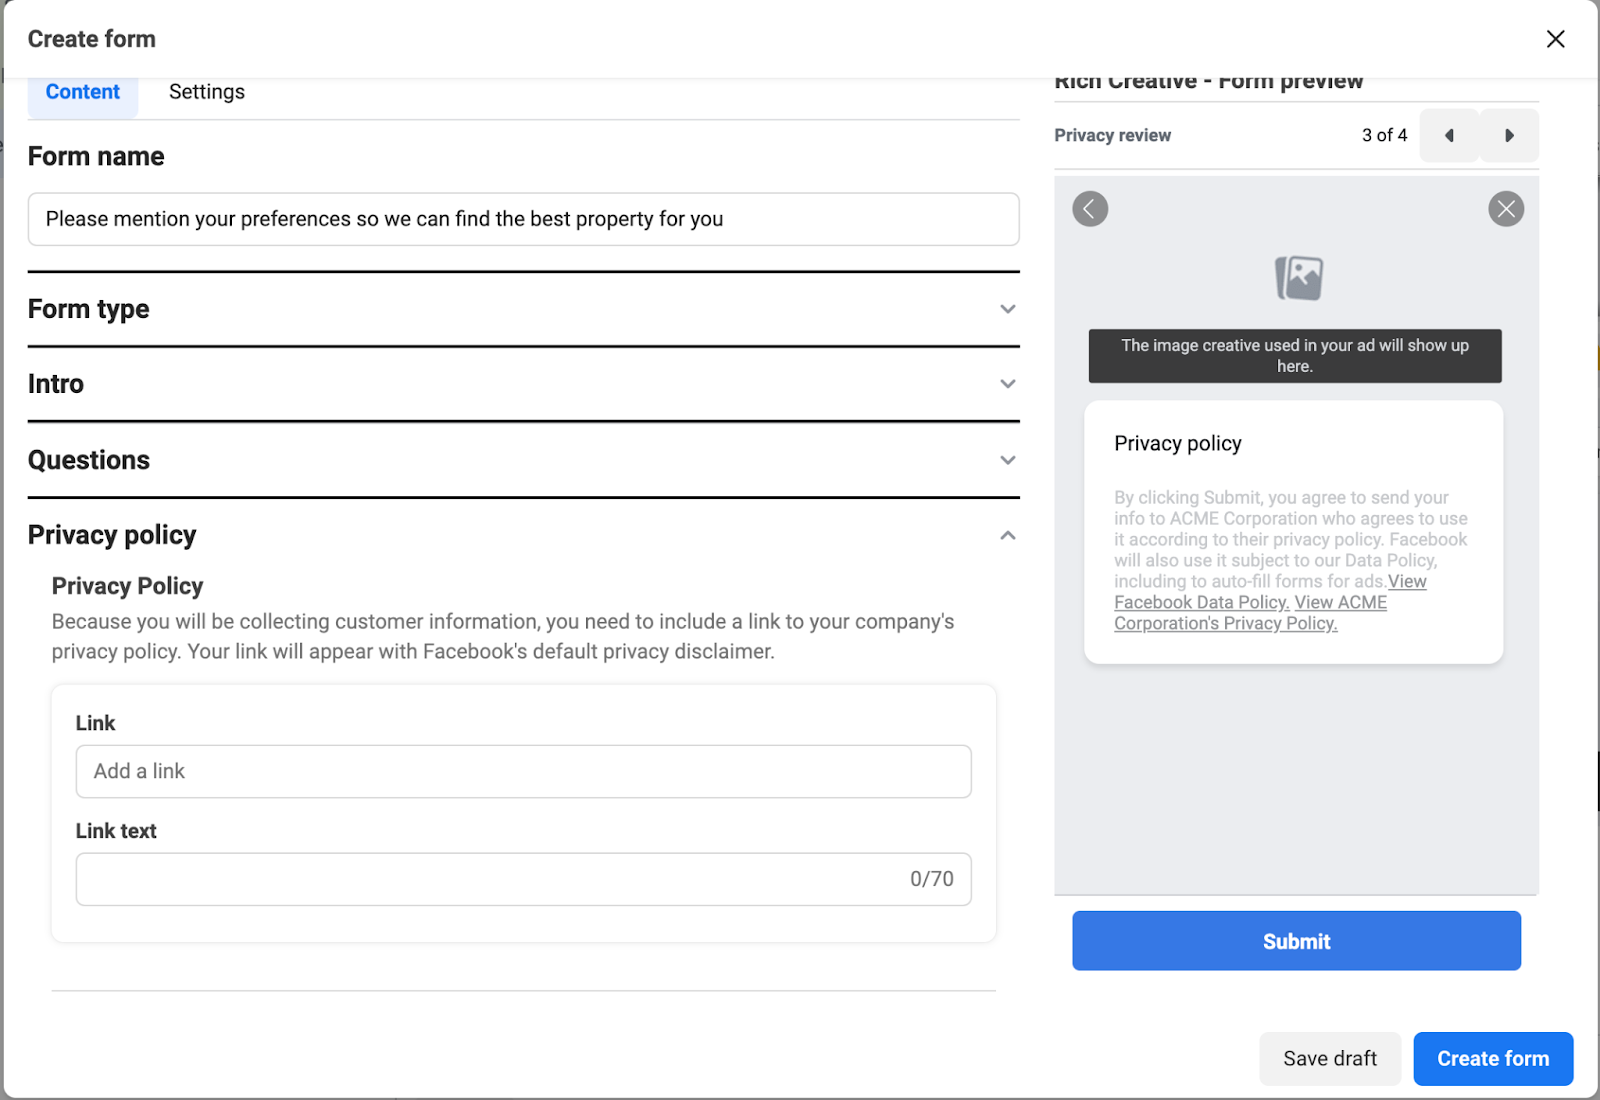
Step 6: Paste your Privacy Policy URL
- Paste the link to your privacy policy URL in the link field under Privacy Policy.
- Add a custom disclaimer for any specific legal requirements related to your business or industry if you need.
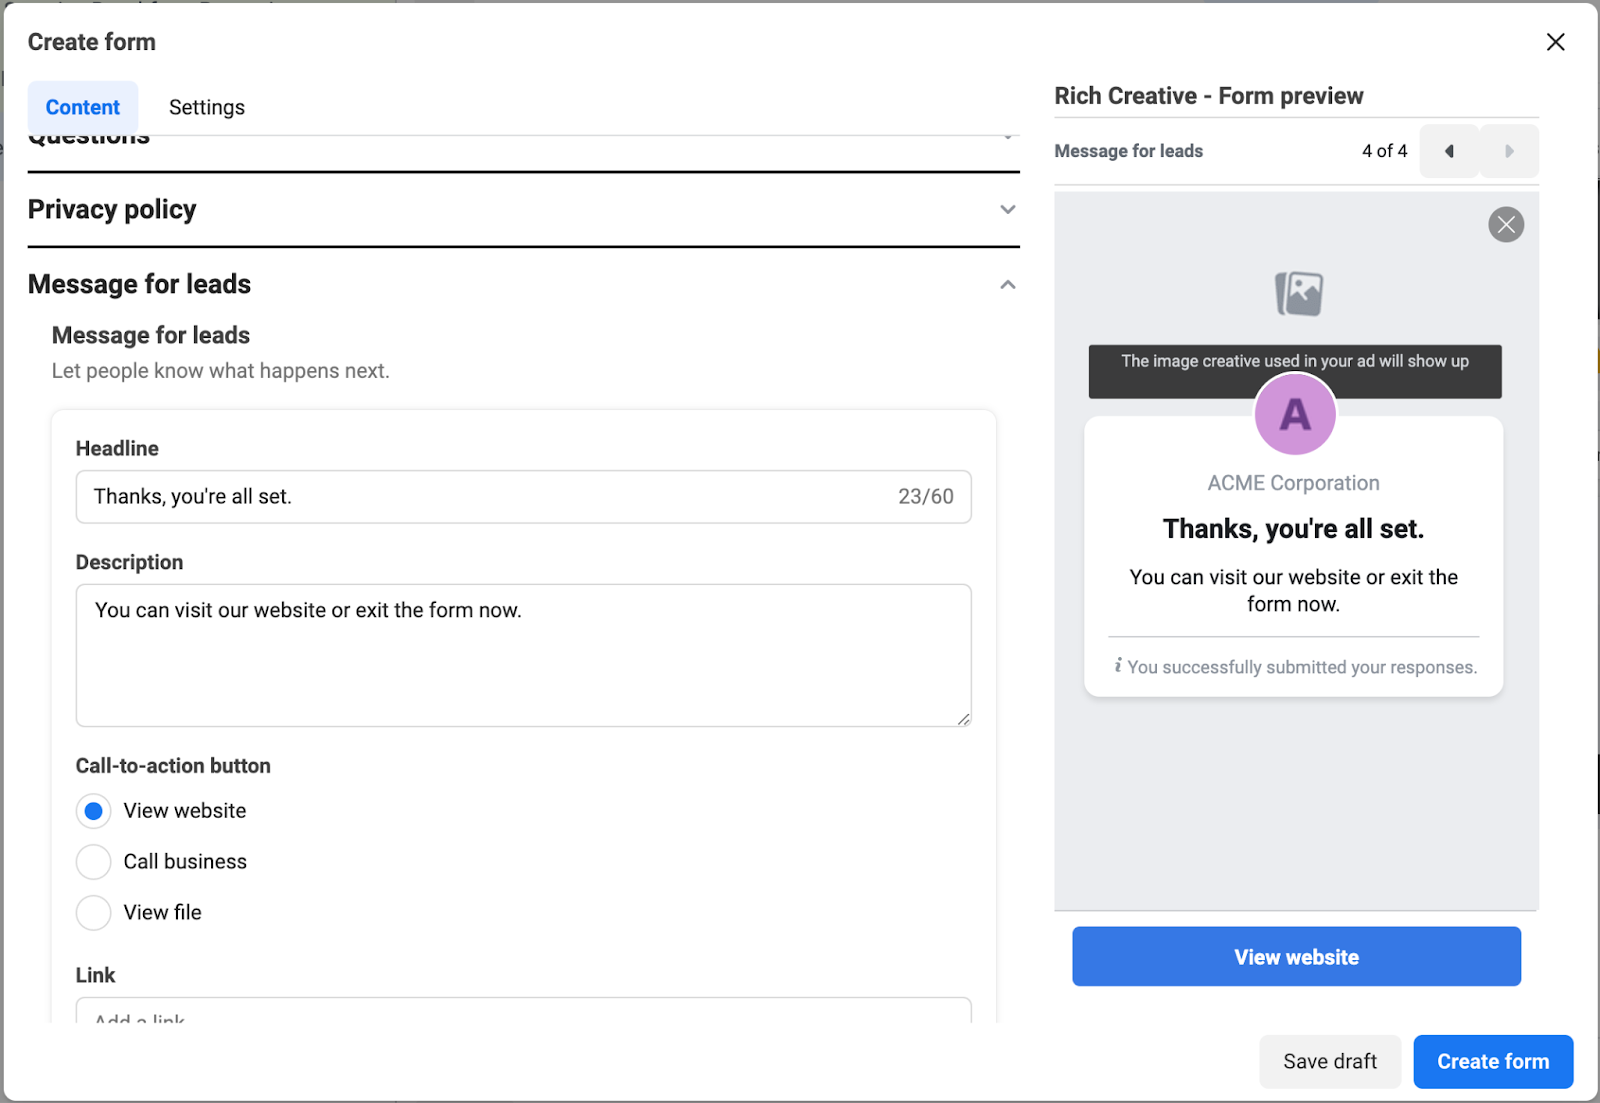
Step 7: Set up completion screen
- Write a thank-you message or provide information on what happens next (like a follow-up call or email).
- Include a CTA button, like “Visit our website” or “Download your guide,” linking to a relevant page or resource if needed so the lead can continue their journey in exploring your business.
- Users will see this screen after they submit the form.
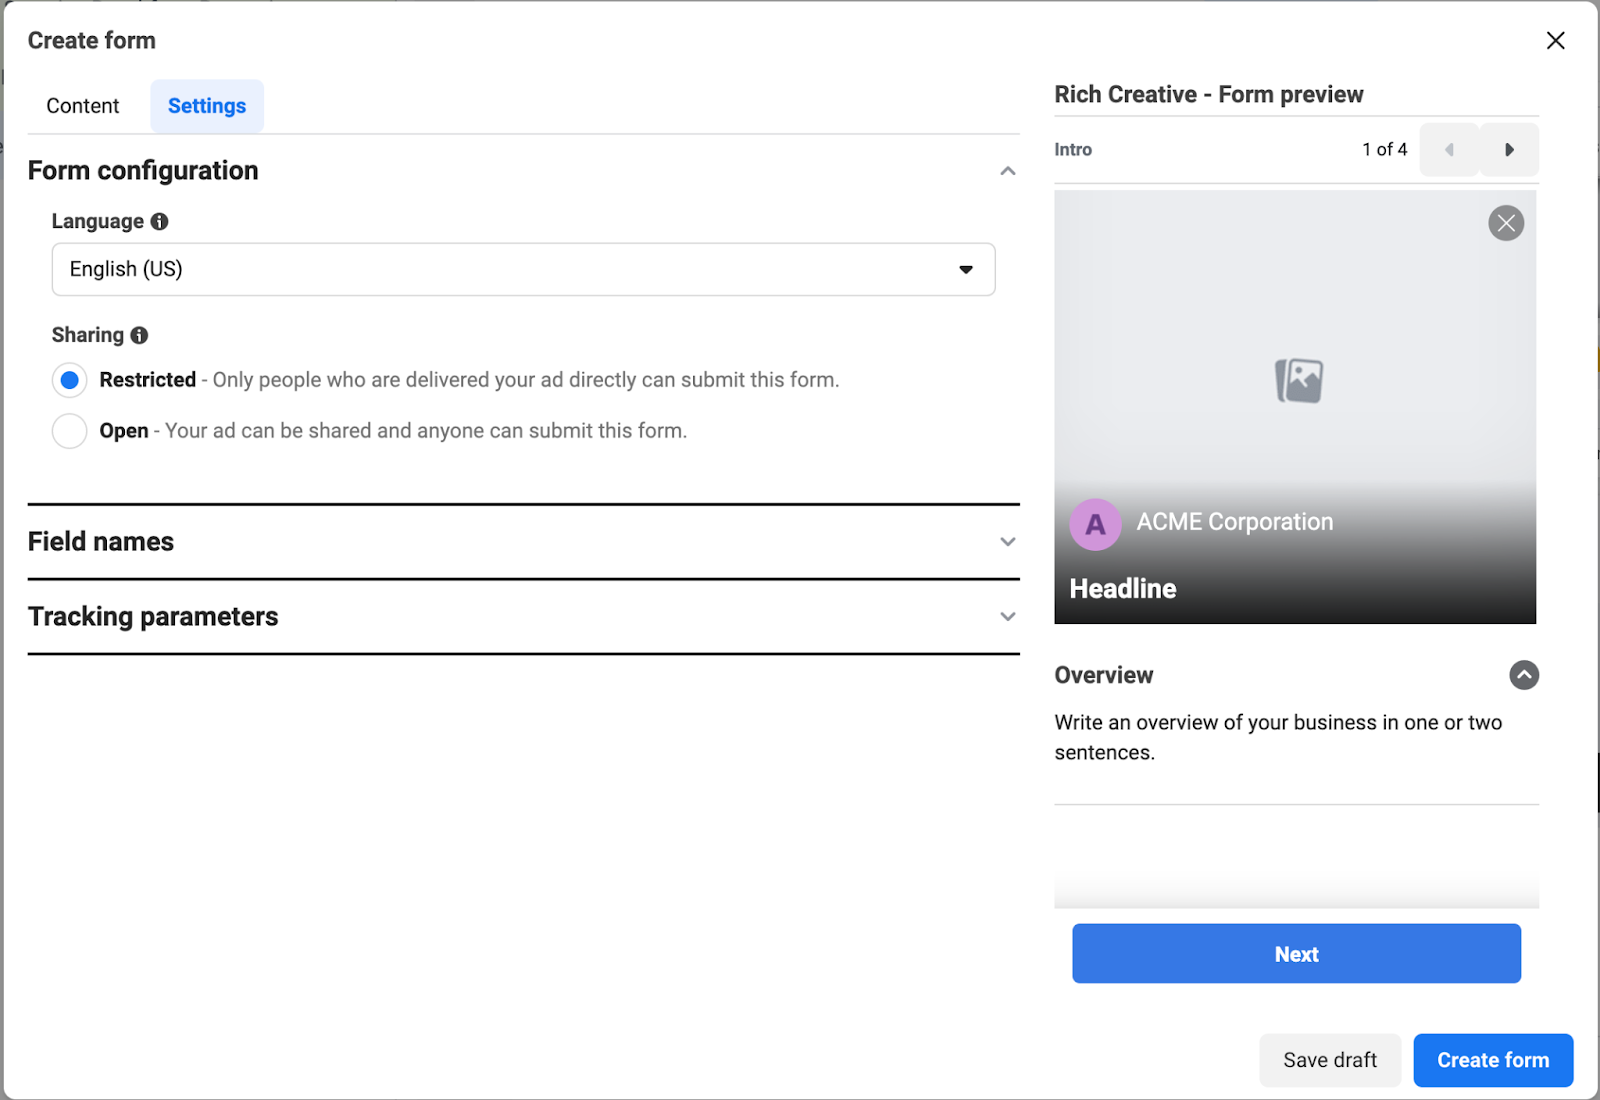
Step 8: Configure additional setting (optional)
- Go to the Settings tab and set up language and sharing options under Form configuration. Next, set up field names and tracking parameters.
You can now click the Create Form button and your form is ready.
Consider these elements to make a great form
Creating an effective Lead Form on Facebook involves careful consideration of several key elements. They play a crucial role in ensuring that the form successfully captures the necessary information from your leads. Here’s what you may want to consider while creating a Lead Form on Facebook:
Simplicity and clarity: The easier the form is to understand and fill out, the higher the completion rate. Therefore, avoid using complex language or jargon while creating a lead form. Label each field clearly and mention the purpose of the form.
Form fields: Additional fields can decrease the likelihood of form completion. Therefore, only ask for essential information. Common fields include name, email address, and phone number. Customise the fields to what is absolutely necessary for initial customer engagement.
Design: Try to make the form visually appealing and consistent with your brand’s aesthetic. Use attractive colours, fonts, and styles.
Call-to-action (CTA): Always ensure the CTA is clear, compelling, and mentions exactly what the user is signing up for. For instance, phrases like “Get your free guide” or “Subscribe to our newsletter” are direct and inform users about what they will receive.
Mobile optimisation: As a significant portion of users access Facebook on mobile, the form should be responsive and user-friendly on mobile. Ensure that the form is easy to complete on mobile devices.
Custom fields and questions: Consider including custom fields or questions to customise your form to your specific needs. This can help segment your audience and gather more targeted information.
Testing and optimisation: Lastly, always test different versions of your form to see which elements work best. This includes experimenting with different field types, layouts, CTAs, and value propositions.
Final words
Creating a Lead Form on Facebook is an easy and straightforward process. However, the main challenge lies in creating a Lead Ad that not just attracts many leads but also guides them through form completion. Therefore, it’s best if you always research a few important details before planning and publishing your lead ad. They may include target audience, competitors, platform specifics, market trends, customer expectations, etc.


")
